Wednesday, January 25, 2012

Classic White Birthday Cake & Mocha Frosting - dairy free & vegan


 As you may know, my birthday was Friday. (hey. take the survey.) Friday itself wasn't super exciting (though I did have a lovely dinner out) since I spent the day looking at apartments. I visited six(!) as part of my vetting process. My reward was watching tv and opening presents (with help). Now that was good times. My big birthday present and surprise was a visit from two of my favorite people, coordinated by Mr Official Taster. E and W flew down from Seattle to spend the weekend with me! Yes, ladies and gentlemen, he definitely deserves a round of applause for that one.  awesomesauce.


We had a great time. (and Birthday Champagne doesn't hurt) Predictably, food occupied a lot of our time and energy, but we four also went to check out the best of the apartments I looked at on Friday. Everyone ok'ed it, and Mr OT and I decided it was to be our new home. Phew. I am so glad the search is over and that we have a permanent place. 


The new kitchen is insanely tiny - definitely the smallest I've ever had - but that seems to be consistent in this area. Apparently apartment builders have learned that renters prefer their square footage in their bedrooms, living rooms, and even bathrooms. Or do they just assume that people don't really cook? I know that we're told that people cook less than they used to, and I'm sure that's true, but it would be pretty sad if some people never cooked. For my new kitchen, creative organization will be required.


Anyway, back to birthdays. This so-called furnished kitchen is less than actually really furnished, so I aimed for a simple recipe with as few ingredients, pans, and messy steps as possible. 1-2-3-4 Cake is an old classic, and the name comes from the ingredients: 1 cup milk, 2 cups sugar, 3 cups flour, 4 eggs. The finished product, however, was decadent, and the one I made this weekend was not for the faint of heart. 3 layers of cake, raspberry jam, and mocha buttercream. It was a happy birthday indeed.


Classic 1-2-3-4 Cake - dairy free
makes 3 9-inch layers. I halved the recipe and made 3 6-inch layers. You can also make cupcakes (24?)
1 C (2 sticks) vegan butter, at room temperature
2 C sugar
4 eggs
3 C sifted self-rising flour*
1 C non-dairy milk of choice (I used almond)
1 tsp vanilla

Preheat oven 350°F. Grease your pans, place a round of parchment paper in the bottom of each, and grease the paper.

With an electric mixer, cream butter until fluffy in a large bowl. Add sugar and continue to beat for another 5-7 minutes. Add eggs one at a time and beat well after each one. Alternately add the flour and milk to the creamed mixture beginning and ending with flour. Add vanilla and mix in until just combined. Divide batter evenly among prepared pans. Level batter with a spatula or by dropping the pans onto the counter from a height of 2-3 inches a few times. Bake for 25-30 minutes, or until a toothpick or tester inserted into the center comes out clean. If you're making cupcakes, start testing at 15 minutes. Allow to cool for 5-10 minutes in the pan before turning out onto a cooling rack and allow to cool completely.

* Self-rising flour has both salt and baking powder in it, but you can make your own at home with the following formula: 1 cup self-rising flour = 1 cup all-purpose flour, minus 2 teaspoons + 1 1/2 teaspoons baking powder + 1/2 teaspoon salt.

Mocha Frosting - Vegan
I made one full batch for my 6-inch cake and had some left over, but I think if I had used frosting between the layers instead of raspberry jam, the amount would have been perfect.

1 stick vegan butter at room temperature
3 C confectioners sugar
1/3 C cocoa
1/4 C strongly brewed coffee or espresso at room temperature (ish. NOT an exact measurement)

Cream the butter and then add the sugar and cocoa a little bit at a time. Add the coffee slowly, until you've reached the desired consistency. It should take 10 minutes or so to combine everything and beat it enough to give it some volume.

Assemble the Layers!
Stack the layers in whatever order you'd like, and frost just like you would any other cake. I used raspberry jam between each layer, rather than frosting, and it was decadent and delicious. I highly recommend it! This and this are good tutorials if you need instructions or a refresher.

Monday, January 23, 2012

Oatmeal Bread - vegan


When Mr Official Taster set his sights on moving back to California, visions of palm trees swaying in the warm ocean breezes danced in his head. To be fair, we did miss Snowpocalypse 2012: Seattle, but instead the Bay Area greeted us with classic Seattle weather: cool, cloudy, and rainy.

As part of this move, we are lucky enough to have a whole moving package, and a team of people to help us. I can't even begin to explain how helpful is has been to have a realtor to show us around, explain the neighborhood divisions, help us get a feel for the area, and aid in decoding the crazy rental market here. The other great part has been an apartment for us to borrow while we find our new one. It's a fully furnished temporary home, but apparently some people out there have a slightly different idea of what a fully furnished kitchen is. Or maybe they just don't expect any cooking to happen.


Thankfully, they did provide one baking dish, so I was able to make (box) brownies last week. When a girl doesn't have a place to call home, brownies are critical. There are no loaf pans, and mine are in storage, but if there were, this Oatmeal Bread recipe would be perfect. Nice, easy, and forgiving. Perfect for warming your kitchen whether you have this or this for winter.

p.s. you should really please take the survey

Oatmeal Bread - vegan
adapted from King Arthur Flour (the back of the bread flour bag, actually)

3 C bread flour
1 C rolled oats
2 Tbsp olive oil
1 1/2 tsp salt
3 Tbsp brown sugar or honey
2 tsp instant yeast OR 1 packet active dry yeast
1 1/4 C lukewarm water or milk

If you are using active dry yeast, first dissolve it in the warm water or milk before combining it with the remaining ingredients.

In a medium mixing bowl, combine all of the ingredients and mix with a spoon until it starts to come together as a "shaggy" dough. At this point, it'll be easier to continue to knead with your hands, in the bowl, until you've collected all the scraps. Turn the dough onto a lightly floured surface and knead for another 10 minutes or so - until it's smooth. Form the dough into a ball.

Lightly grease another medium bowl. Place dough in the bowl upside down (seam side up), and then flip it over so the seams are on the bottom. This way, you've easily coated the surface with the oil. Cover, and allow to rest for 1 to 1 1/2 hours. It will become puffy, but probably won't double in size.

Lightly grease a 9x5-inch loaf pan. Turn the risen dough into your hands and, using gravity to help, allow the dough to lengthen and shape into a rough log. Place the log in the pan, and gently use your knuckles to convince the dough to reach into all four corners. Cover the pan with lightly greased plastic wrap, and allow the dough to rise for 1 to 1 1/2 hours. Ideally, it will have crested 1 to 2 inches above the rim of the pan. If not, it's ok. It'll still taste delicious.

Preheat your oven to 350F. Bake the bread for 35-40 minutes. Top will be golden, and you can test that an instant-read thermometer inserted into the center registers 190F. Remove from the oven, and allow to cool in the pan. When the pan is cool enough to handle bare-handed, turn out the loaf and completely cool on a wire rack.

Notes:
This is an amazingly forgiving recipe. I have made it successfully with the wrong amount of water, quick-oats, no oil at all, and without dissolving my active dry yeast in water first (all separate mistakes, thank goodness!). It's great for toast (the aroma is heavenly), sandwiches, or just snacking on.

The original recipe called for butter where I use olive oil and milk where I use water. Pick and choose as you like.

For the original, and for bread machine instructions, head on over to King Arthur Flour.

Friday, January 20, 2012

Tell me what you want, what you really, really want


Although the blogiversary passed this year without much fanfare (unlike last year), I didn't forget about it. I was homeless at the time, which sort of cut down on my ability to celebrate with a new recipe or a giveaway. However, I do want to take a short moment to thank all of you for reading and encouraging me to try new recipes. It's like experimenting in science class, except now I am allowed to eat the results.

As part of my continuing effort to make this blog better and you, dear readers, happier and more satisfied, I've put together a super short survey that I would love for you to take. It's only 10 questions! The definition of short and sweet! You can do it!

Hearing from you about what you think and what you want will help me out. merci beaucoup.

Also, since today is my birthday (weeeeeeeee!), you can consider it part of your present to me. And really, it's Friday: do you seriously want to be doing work?

Soundtrack: Wannabe

Thursday, January 19, 2012

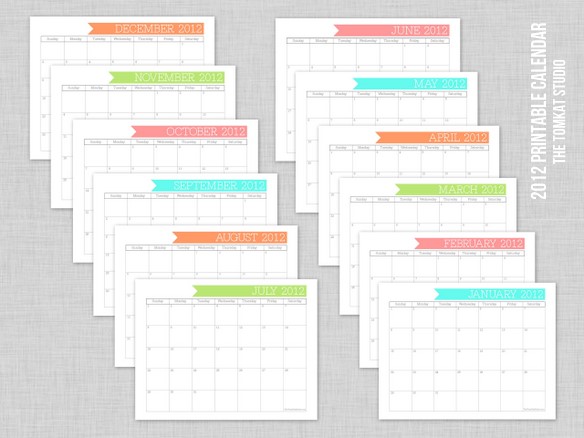
Free Printables - 2012 Calendars Round Up

via cottage industrialist

I know, I know...it's already more than halfway through January. But if you're anything like me, you're just now registering that it's a new year. So to help you realize that in full, I've got a collection of cute calendars to help you figure out what day (and year) it is.

in your choice of colors via living locurto

I found several different formats to try and satisfy all your different tastes. I know it's impossible, but I tried.

via The Tomcat Studio

This last one is from one of my favorite blogs and is completely customizable. I think it's pretty fun.

via Young House Love
They include all the months, promise. And you can put in pictures of your own kids and pups. So generous.

Has anyone else been struggling with realizing it's a new year, 19 days later?

Sunday, January 15, 2012

Black Tea-Blackberry Sorbet - vegan & gluten free


Last week, Mr Official Taster and I relaxed in Hawaii, along with some family. We had a lovely time, and, at least for me, one of the best parts of the trip was the literal escape it allowed. As I mentioned, Mr OT got a new job in the Bay Area, and as of Saturday evening, we're here.


Since approximately the week of Christmas, our life has been somewhat hectic, very detail-filled, and constantly in upheaval. Between January 1st and 5th, Mr OT left for SanFran, I got the house ready for movers, supervised the packing of all of our worldly possessions, sent off cars for transport, cleaned so we get our deposit back, took care of a hundred moving-related details, crashed at wonderful and generous friends' house, got the puppies to boarding and myself to the airport.


By the time I landed in Lihue, I was, to put it mildly, exhausted. My week there involved indulgent amounts of sleep, many books, much lounging, and lots of ocean viewing. There was minimal emailing, interneting, and texting. It was lovely and the perfect escape.


In the spirit of escape, I bring you a Black Tea-Blackberry Sorbet. If you were to make it in season, it would be warm outside, mosquitos might bother you at dusk, and, if you're lucky, you would see fireflies in the evening. However, if you need an escape from a dark and cold winter, I suggest using frozen berries and giving yourself a taste of the summer to come.


Black Tea-Blackberry Sorbet - vegan & gluten free
adapted from honey & jam
It occurs to me that this would be fun and unexpected for Valentine's Day - the color is great!

2 C water
2 black tea bags
1 C sugar
3 C fresh or frozen blackberries; if frozen, let thaw completely and drain
1 Tbsp vodka
2 Tbsp lemon juice

Bring water to a boil. Remove from heat, add tea bags and allow to steep for 5 minutes. Remove tea bags, add sugar and stir until the sugar dissolves. Allow to cool completely.

Puree blackberries in a food processor, then push through mesh sieve to remove seeds. Pour vodka and lemon juice through the sieve to help get the blackberry through. Add the tea, then pour back through sieve.

Process the mixture in an ice cream maker according to manufacturer's instructions.

Monday, January 9, 2012

Thank You Cards - free printable


If you haven't been inspired to write thank you notes to people yet, maybe these lovelies from 74 Lime Lane will inspire you to do so! She also has them in a couple other color combinations. I love how simple and cheerful they are, and some eagle-eyed readers may recognize them if they have also given me presents lately.

Sunday, January 1, 2012

Related Posts Plugin for WordPress, Blogger...