

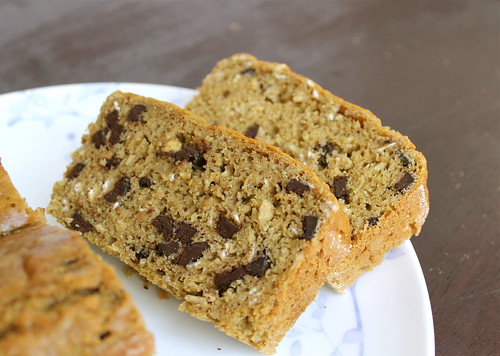
Remember this yummy bread? Well, what I didn't tell you then was that I was really testing an "in a jar" gift recipe. I found the idea originally (via Pinterest, of course) on Sunset magazine's site. The recipe sounded promising, and the idea was a cute one for presents, so I gave it a whirl. I was pleasantly surprised with the resulting loaf, so now I want to show you how you can share this bread without overwhelming your friends and neighbors with perishable sweet stuff.
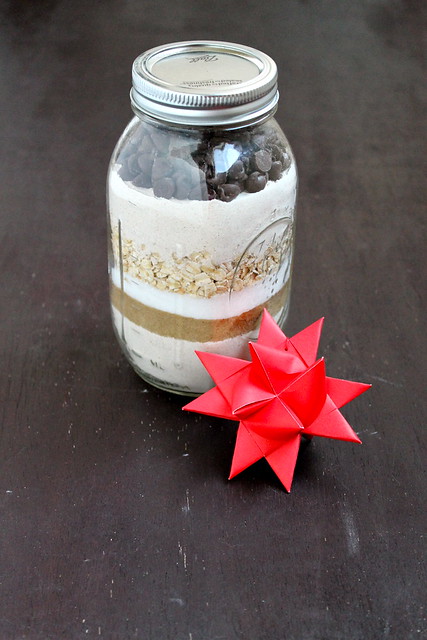
Sunset didn't do a stellar job of explaining, nor did they include cute labels. However, Me and My DIY did. The key to getting all the layers to fit nicely in the quart-sized mason jar was to tamp down each layer really, really well. You need to find yourself something long and relatively thin to stick in the jar and compress each layer. Debbie used a wooden dowel. I ended up using the wand from our espresso machine, but anything long, thin, and flat on one end will work.
I used a paper funnel to get everything into the jar, and after I added the final flour layer, I used a mini spatula to push any remaining flour "dust" down the sides of the glass so it was nice and clear to show off the chocolate chips. Here's the layers I created, starting at the bottom:
2 tsp baking powder
1 tsp baking soda
—————————–
1/2 cup brown sugar
1/2 tsp cinnamon
1/2 tsp nutmeg
—————————–
1/2 cup granulated sugar
1/2 tsp salt
—————————–
1 cup rolled oats
—————————–
1 cup all purpose (or white whole wheat) flour
—————————–
1/2 cup granulated sugar
1/2 tsp salt
—————————–
1 cup rolled oats
—————————–
1 cup all purpose (or white whole wheat) flour
—————————–
approx 3/4 cup chocolate chips (miniature would be cuter), or anywhere between 1/2 and 1 cup. Basically, whatever fits
approx 3/4 cup chocolate chips (miniature would be cuter), or anywhere between 1/2 and 1 cup. Basically, whatever fits
I haven't added a label to mine yet (bad blogger!), but a cute custom one is available over at Me and My DIY. She also has a pretty funny step-by-step. Alternately, I've collected a bunch of holiday and jar labels right over here. You can customize them as you wish.

However, because this is me and I like to accomidate lots of diets, please note that if you're gifting this to someone who doesn't do dairy, you'll want to alter the instructions you attach.
Dairy free version:
Preheat oven to 350°F. Grease and flour a 9-x5-inch loaf pan.Combine scant 1 1/2 C nondairy milk + 5 tsp lemon juice/vinegar in a small, non-reactive bowl. Set aside for at least 10 minutes. Beat in 2 eggs and 1/4 C vegetable oil. Set aside.
Pour the contents of this jar into a large bowl and mix together. Pour wet mixture into dry ingredients & stir until just evenly moistened. Your batter will be lumpy, and that is just the way it should be.
Pour batter into prepared pan and bake until a wooden skewer inserted in the center comes out free of batter (if you poke a chocolate chip, you may end up with a chocolatey skewer, but you don't want to see any of the bread attached), about 65 minutes.
Regular version:
Preheat oven to 350°F. Grease and flour a 9-x5-inch loaf pan.
Combine scant 1 1/2 C buttermilk, 2 eggs, and 1/4 C vegetable oil or melted butter. Set aside.
Pour the contents of this jar into a large bowl and mix together. Pour wet mixture into dry ingredients & stir until just evenly moistened. Your batter will be lumpy, and that is just the way it should be.
Pour batter into prepared pan and bake until a wooden skewer inserted in the center comes out free of batter (if you poke a chocolate chip, you may end up with a chocolatey skewer, but you don't want to see any of the bread attached), about 65 minutes.
I just found a jar of this that a friend gave me a year ago. I baked it but I noticed that on your site it says it keeps 2-3 months. Has anyone stored it longer? I really hate to waste it but I also don’t need to make anyone sick!
ReplyDelete