Showing posts with label healthy. Show all posts

Tuesday, September 30, 2014

Pumpkin Cornbread - vegan

Pumpkin Cornbread

A few weeks ago, I boldly promised to keep this a "pumpkin-spice-anything-free zone," and I'm proud to say that's still true. I will admit, however, that I noticed a loophole and decided to take advantage of it. You see, I didn't outlaw actual pumpkin. Sneaky, you accuse? Yep. But, in my defense, loopholes are a proud American tradition, and it is technically fall now, so pumpkin is actually appropriate.

Pumpkin Cornbread, vegan

I came across a recipe for a honey pumpkin cornbread, started making it, realized my cornmeal was not-so-good, ran and got a new bag, finished the recipe, and after all of that, was supremely disappointed. It was dry. It was boring. It tasted like pumpkin but not at all like cornbread. Or honey, particularly, come to think of it. I knew I liked the idea in general, so I basically tore the recipe up (well, virtually tore it up. and by "tore it up" I mean I no longer have it Pinned) and started all over.

Pumpkin Cornbread - vegan

I switched from honey to maple syrup and reduced the volume. I got rid of an egg and some pumpkin-y spices. I introduced creamed corn to the ingredient list and reduced the milk. A few other tweaks, and I was ready to try again.

vegan Pumpkin Cornbread

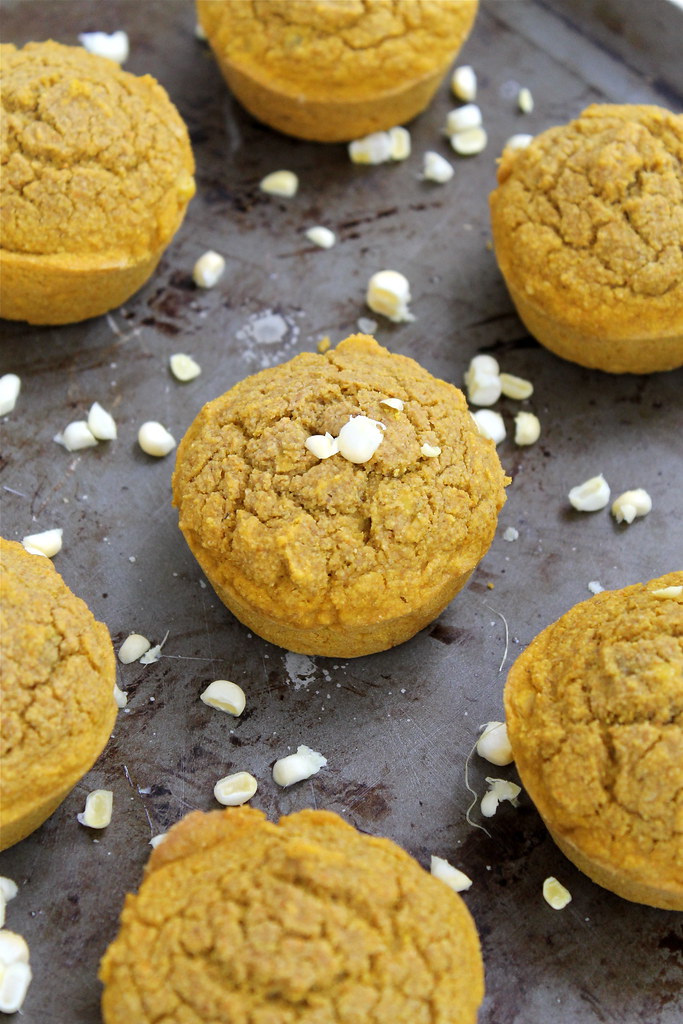
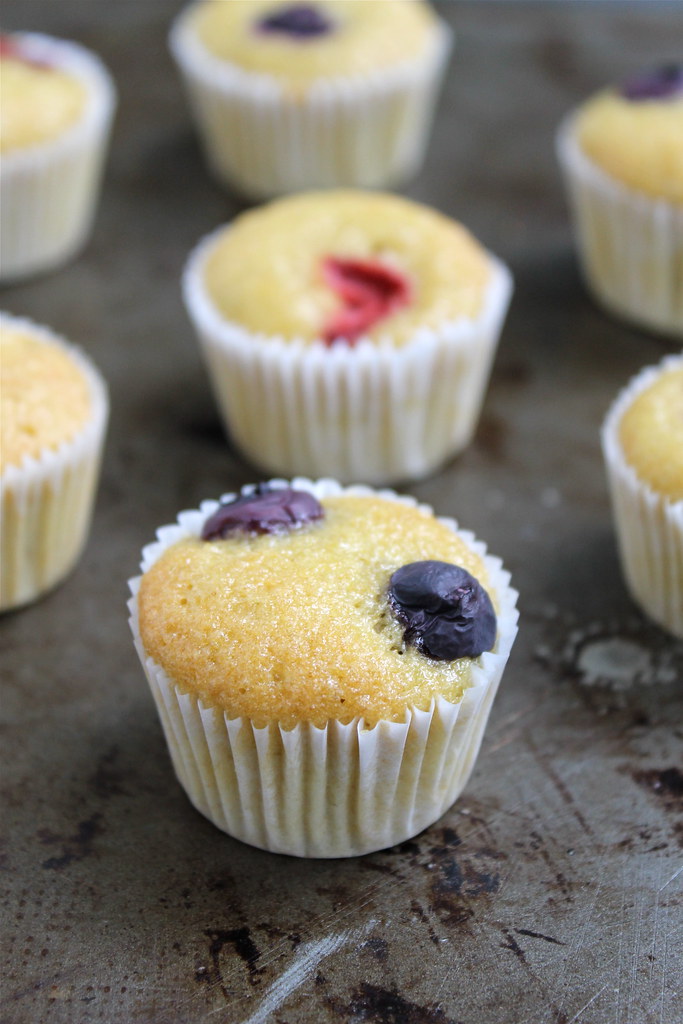
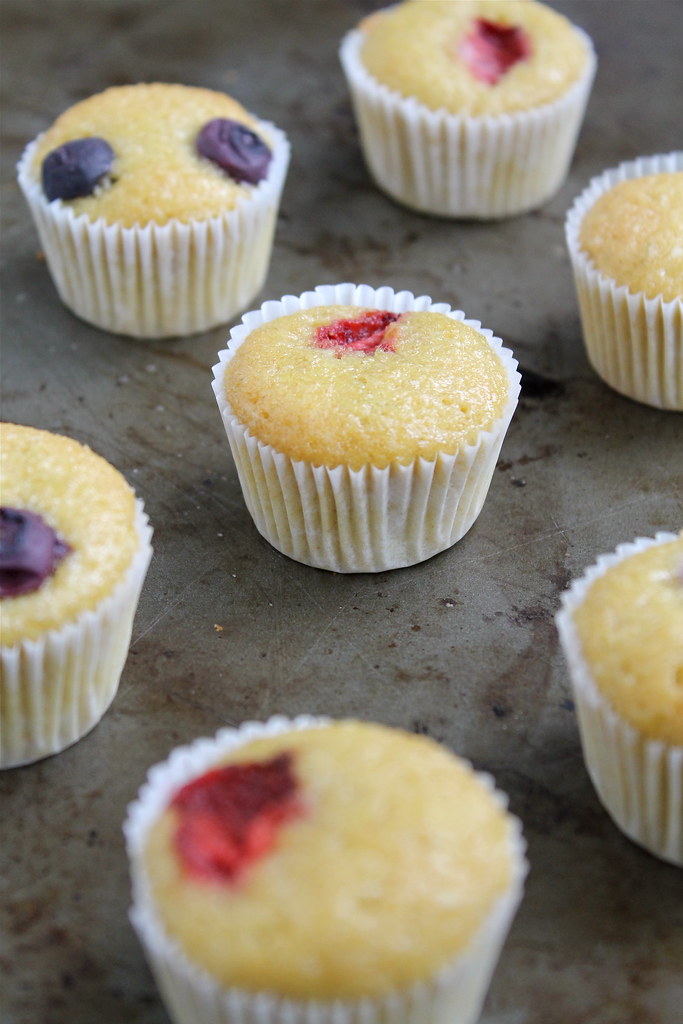
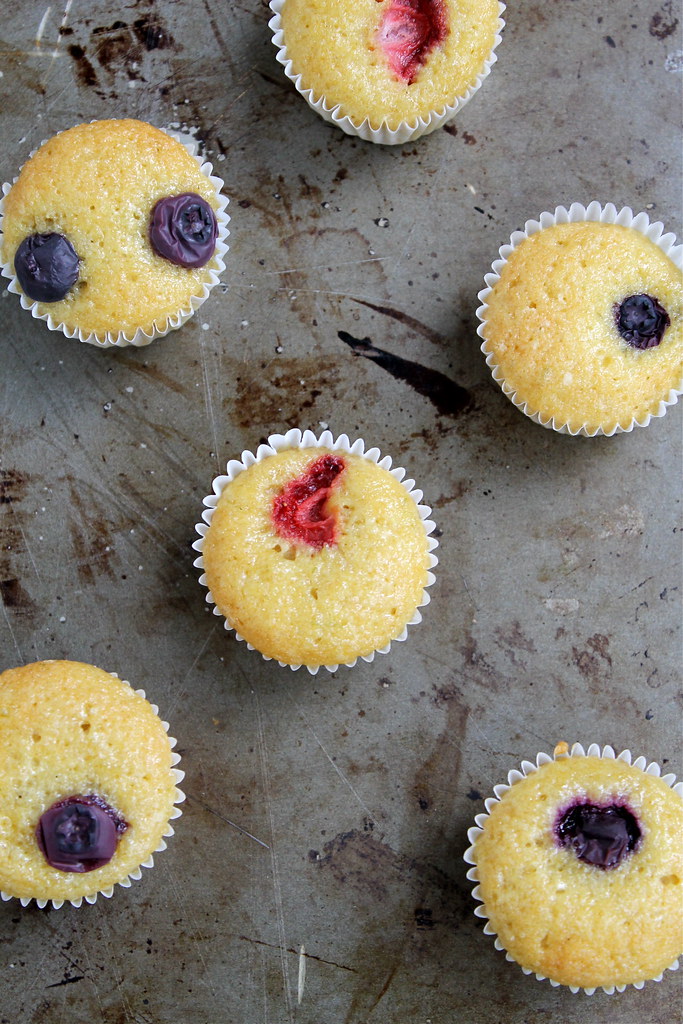
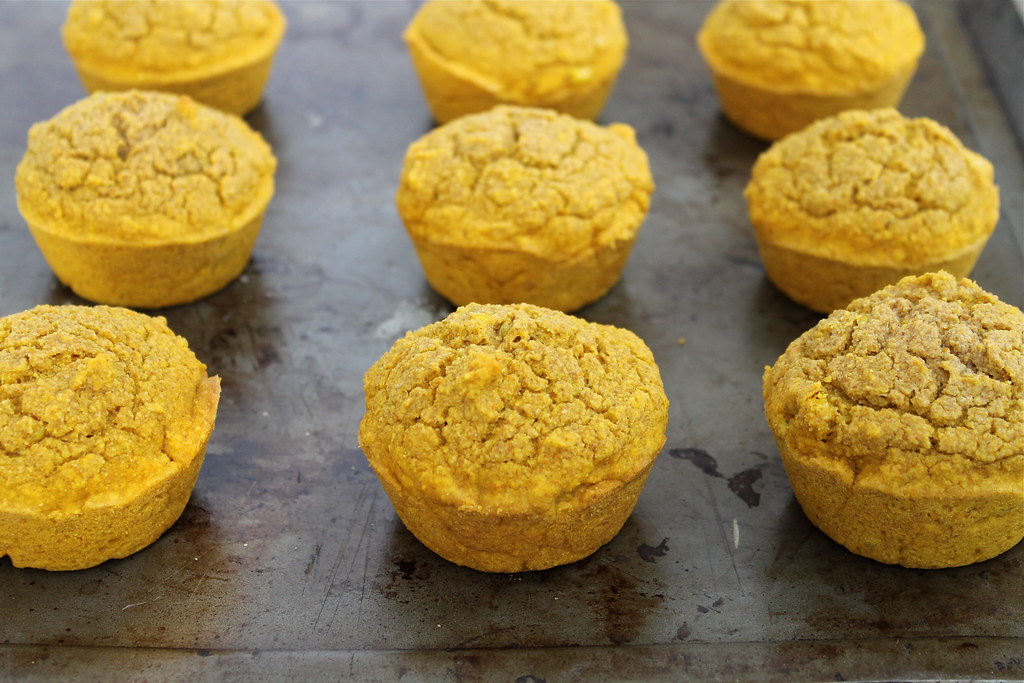
Ladies and gentlemen, we have a winner. This pumpkin cornbread blends and balances both flavors so that you can really tell each is there. It's moist (even the next day) and not too sweet. In short, it's all the good things that cornbread should be.


Pumpkin Cornbread - vegan
a Short & Sweets original


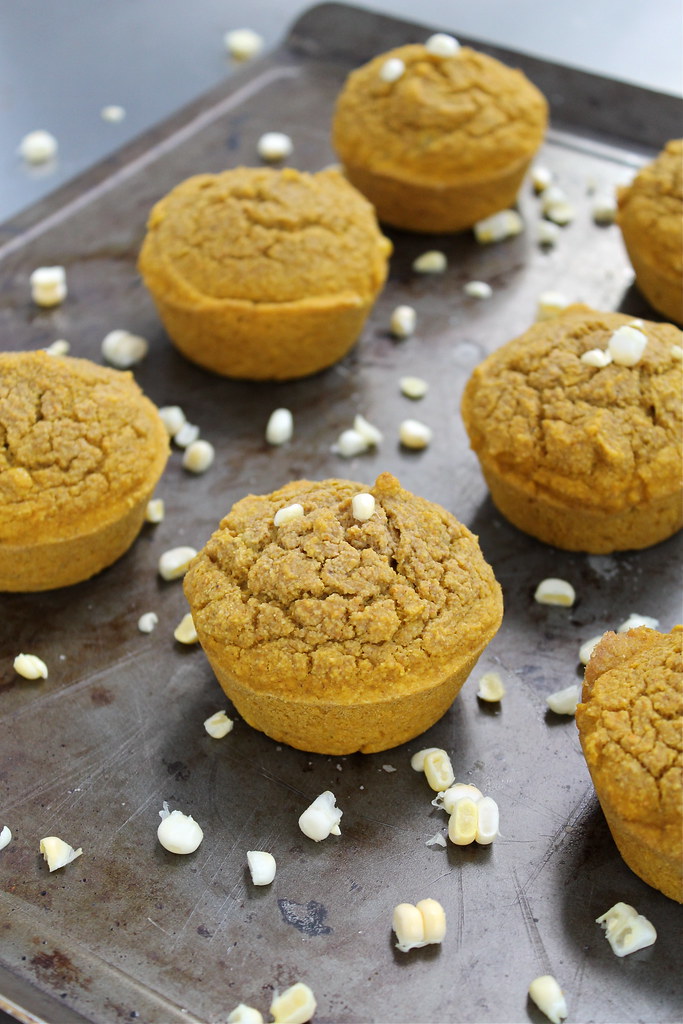
If you make this when there is still fresh corn available, I think a handful of fresh kernels would be a tasty addition. I see no reason why you couldn't make either mini or jumbo muffins and adjust the bake time accordingly. Also, I haven't tried myself, but they should freeze just fine if well-wrapped.

If you are looking for a breakfast treat, drizzle some maple syrup over a warm muffin. It's fabulous on a fall morning. Otherwise, I recommend pairing these with black bean sweet potato chili or red bean chili. Or, if you want to go pumpkin-crazy, pumpkin chili

3/4 C non-dairy milk
1 Tbsp apple cider vinegar
1 1/4 C yellow cornmeal
1 C whole wheat pastry flour
2 tsp baking powder
1 tsp baking soda
1/2 tsp salt
2 Tbsp vegetable oil (or melted coconut oil or vegan butter)
3/4 C canned pumpkin
3/4 C creamed corn
1/4 C maple syrup (or other liquid sweetener)


In a medium-sized non-reactive bowl or large glass measuring cup, combine non-dairy milk and vinegar. Set aside for at least 10 minutes.

Preheat oven to 400F. Grease a standard, 12 cup muffin tin with nonstick cooking spray or line with paper liners. 

In a large bowl, stir flour, cornmeal, baking powder, and salt together. Whisk oil, pumpkin, creamed corn, and maple syrup into the milk+vinegar mixture. Add wet ingredients to dry ingredients and stir until just combined. Divide batter evenly among muffin tins. Bake for 15-18 minutes or until a toothpick comes out clean or with just a few crumbs attached.

Cool for 5 or 10 minutes in the pan, then remove and serve immediately or allow to cool completely on a wire rack. In an airtight container, muffins stay moist for 3-4 days. 

Wednesday, September 17, 2014

Fruit Topped Citrus Olive Oil Muffins - dairy free

Blueberry Topped Citrus Olive Oil Muffins | http://www.katesshortandsweets.com

Can we take a minute and just appreciate the cuteness of mini things? They're just better.

That's right, take a moment. Enjoy the cuteness.

Now that we've got that (mostly) out of the way, let's talk about how delicious they are. Because they are. They're perfect little sweet morsels for parties, for lunch boxes, for a breakfast treat. And the other great thing about them is that they are relatively healthy. Heart healthy olive oil, fruit, and not an overwhelming amount of sugar means you can feel good ok about stuffing twelve into your mouth. Not that I've ever tried anything like that.

Fruit Topped Citrus Olive Oil Muffins, dairy free | http://www.katesshortandsweets.com

These (cute) little bite sized treats were very popular party treats last month. They're nice and light, sweet, and the fruit pieces give nice juicy bursts. Olive oil is one of those ingredients that people (ahem. Mr Official Taster) think sounds odd as part of a baked good, but, invariably, if they try it, they like it. Olive oil pairs especially well with citrus or rosemary, which makes sense given their shared growing region (like how tomatoes and basil go together).

Fruit Topped Citrus Olive Oil Muffins - dairy free | http://www.katesshortandsweets.com

You might look at the written recipe and think it's too fussy. Think again. Although these yummies are not one-bowl wonders, they're really pretty easy, hard to mess up, and worth a couple dirty bowls. Additionally, you could definitely make a batch and freeze some for later. Put them in your freezer, label them, and forget about them. That way, you will be rooting around looking for some corn for chili one day and come across your stash. It'll be on par with finding a $5 in your jeans.

But way cuter.

Strawberry Topped Citrus Olive Oil Muffins, dairy free | http://www.katesshortandsweets.com


Fruit Topped Citrus Olive Oil Muffins - dairy free
adapted from How to Cook Everything

The fruit topping is completely adaptable to what you like, what allergies you may be dealing with, or even what colors you want. Red and blue are great for July 4th or Memorial Day parties. How about star fruit? Red and green (kiwis, perhaps?) for Christmas. Or pink raspberries for a little kid's birthday party. You get the idea- have fun! 

cooking spray (or liners) for pan
4 eggs, separated and room temperature
1/2 C extra virgin olive oil
1/4 + 3/4 C sugar
2 C flour
1 1/2 tsp baking powder
1/4 tsp salt
1/3 C orange juice
zest of one lemon, orange, or lime (grapefruit should be yummy too)
chopped or whole berries (or other fruit)

Separate your eggs when you first take them out of the refrigerator because it's easier when they are cold. Then allow them to come to room temperature for 30 min or so.

Preheat the oven to 350 degrees F. Spray or line muffin or mini muffin trays.

Using an electric mixer, beat the eggs whites in a small bowl until they foam. Then sprinkle in 1/4 C sugar while still beating the whites. Continue beating until the whites hold soft peaks.

In a large bowl, add the olive oil and 3/4 C sugar and beat together. Add the egg yolks and beat until thick and fluffy (5-7 minutes). Mix in the flour, baking powder, and salt. Next, mix in the orange juice and zest. The mixture will be very thick and/or crumbly. If it's crumbly, add in a splash more of juice. Don't despair.

Add the beaten egg whites to this thick mixture. As gently as possible, thoroughly fold together the batter and egg whites. You may think they will never combine, but they will.

Spoon batter into cupcake pans. I used minis and topped each muffin with a couple blueberries or a slice or two of strawberry. Do what makes you happy.

Turn the mixture into your prepared pan and bake for 15-20 minutes (or until a toothpick inserted into the center comes out clean), depending on muffin size. Obviously, mini muffins will cook a few minutes faster than standard size ones. (15ish for minis, 18-20 for standards) Let the muffins cool in the pan for 10 minutes or so, then remove and allow to cool completely on a wire rack. 

Thursday, June 26, 2014

Tex-Mex Casserole - vegan & gluten free

IMG_6390

If you've been following along for a while, you may have picked up that a) I admit to being lazy fairly often b) my recipes are generally low-fuss and c) the ingredient lists aren't usually terribly long.

At first glance, this recipe may appear not to fit into any of the above categories. That first glance would be wrong. It takes about 20 minutes to put together from beginning to oven, and while there are more ingredients than I usually list, the whole thing is pretty easy and very satisfying. I suspect that you have most (if not all) of the ingredients in your pantry already. This was the first meal I made when we got back from vacation, and the fridge was pretty bare. I didn't even have all the ingredients the first time I made it, and it was still delicious.

IMG_6354

To streamline it further, make the rice in advance. I like making it in the morning. The rice cooks while I putz around and eat breakfast, so it's all set at night. If you're one of those big batch cooks, make a batch of rice and freeze it in portions. Then just defrost what you need.

IMG_6392

This is one of those recipes you can scale up or down, and it's going to satisfy not only lots of dietary restrictions, but it's going to satisfy vegans and omnivores alike.


Tex-Mex Casserole - vegan & gluten free
adapted from Oh She Glows

Don't have ingredient or two? Don't sweat it. Unless it's something major like rice, beans, or tomatoes, you can probably skip it. Want it spicier? Add another jalapeno. Don't like spice? Don't use a jalapeno. Have some frozen edamame taking up space in your freezer? It can definitely go in with the corn (or in place of it). You can halve the recipe and bake it in a smaller pan. If you double it, you'll need to use a second large pan. 

for the spice blend
1 Tbsp (150mL) chili powder
1 1/2 tsp (7 mL) ground cumin
1 tsp (5 mL) smoked sweet paprika or 1/2 tsp (2 mL) regular paprika
1/4 tsp (1 mL) cayenne pepper, plus more as needed
1 1/4 tsp (6 mL) fine-grain sea salt
1/4 tsp (1 mL) ground coriander (optional)

for the casserole
1 1/2 tsp (7 mL) extra-virgin olive oil
1 red onion, diced
3 cloves garlic, minced
2 bell peppers, ideally two different colors, chopped
1 jalapeno, seeded if desired, and diced
salt and pepper to taste
1/2 C (125 mL) fresh or frozen corn
1 14oz/397g can diced tomatoes (with their juices)
1 C (250 mL) tomato sauce or tomato puree
2 to 3 C (500 to 700 mL) chopped kale leaves or baby spinach
1 15oz.425g can black beans, drained and rinsed
3 C (750 mL) cooked rice (wild, brown, or white - your choice)
1/2 C (125 mL) vegan shredded cheese, such as Daiya (optional)
1 to 2 handfuls tortilla chips, crushed (gf for gluten free folks)

optional topping ideas
green onions, salsa, avocado, additional cheese, fresh chopped cilantro, vegan sour cream

Directions
Preheat oven to 375F. Oil a large baking pan.

In a small bowl combine all the spices for the blend. Set aside.

In a large wok, pot, or Dutch oven (when I halved the recipe, I was able to use a large sauce pan), heat the oil over medium heat. Add the onion, bell peppers, and jalapeno. Saute until starting to soften (approx 5-7 minutes). Add garlic and cook another minute or two. Season with salt and pepper.

Stir in spice blend, corn diced tomatoes and their juices, tomato sauce, kale or spinach, beans, rice, and 1/4 cup (60 mL) of the vegan shredded cheese (if using). Saute for a few minutes and season with more salt and pepper, if desired.

Pour the mixture into the prepared casserole dish and smooth the top. Sprinkle the crushed chips and then the remaining cheese (if using) evenly over the mixture. Cover with a lid or foil and bake for 15 minutes.

Uncover the baking dish and cook for another 5-10 minutes or so, until bubbly and lightly golden around the edges.

Serve and top, as desired.

Wednesday, May 28, 2014

Whole Wheat Maple Oatmeal Bread - vegan

Whole Wheat Maple Oatmeal Bread - vegan http://www.katesshortandsweets.com

Be not afraid, ye who enter here.

Whole Wheat Maple Oatmeal Bread and Raspberry Jam http://www.katesshortandsweets.com

Seriously, guys? I'd really like to somehow free the American population from their fear of bread. (Yes, I know this sounds rather grandiose.) I can't speak first-hand about other countries, but I suspect they have less fear. (Yes? No? Anyone?) I get that this is a multi-level fear, so let's first get this out of the way: carbs are not the devil. Sure, if all you ate was bread, you'd probably contract scurvy. And sure, if all you ate was bread, avoided scurvy, but never got up from the table, you'd probably gain some weight. But I'm pretty sure some fruit and maybe a walk around the block would solve those problems. So, let's agree to agree here. Good Bread is wonderful.

vegan Whole Wheat Maple Oatmeal Bread http://www.katesshortandsweets.com

Side rant: bad bread is not worth your time, caloric intake, or money. However, Good Bread with capital letters is wonderful.

OK, onto to the next fear: yeast. Also, that bread is a magical, mystical being that has its own unpredictable mind. That there's no use even trying to make yeast bread because the yeast will act all puckish and just do what it wants. All of these fears? Unfounded, I say.

Whole Wheat Maple Oatmeal Bread http://www.katesshortandsweets.com

A well-written, tested (i.e. not just made up) recipe and good ingredients should be all you need. For this specific bread you need flour (all-purpose is just fine, but for more flavor and healthy stuff, white whole wheat and whole wheat are lovely), yeast, oatmeal, salt, oil, maple syrup (or sugar), and water. That's it. Nothing exotic or scary. As long as you remember that yeast is a living organism, and will perform it's best if treated well (no boiling alive here, please), you will be just fine. Follow the directions, use your sense and your senses, and your home will smell amazing and your carb-loving self will thank you.

Whole Wheat Maple Oatmeal Bread http://www.katesshortandsweets.com

Still nervous? Try the even easier Oatmeal Bread, No Knead Whole Wheat Bread, or English Muffin Bread.


Whole Wheat Maple Oatmeal Bread - vegan
adapted from King Arthur Flour

The boiling water in this recipe serves the dual purpose of softening the oatmeal and helping the sugar/syrup dissolve. I cannot emphasize this enough: do not add your yeast too soon or you will kill it and your bread will not rise. Lukewarm is all that yeast can handle. In place of the maple syrup/brown sugar, you could be fancy and use maple sugar instead (as the original recipe calls for). I suspect (though I haven't tried it) that you could add a tiny bit of maple syrup a little bit at a time to regular sugar, mix thoroughly, and create your own maple sugar. 

This recipe yields two loaves of bread, but you could certainly halve the recipe and only make one. But for pretty much the same amount of time and effort, make two, and then share or freeze your second loaf (assuming you don't eat the first one within a day or two). I slathered on some of my Raspberry Peach Jam, but there are no bad choices. 

2 C boiling water
1 C rolled oats, traditional or quick (not instant)
1/2 C maple syrup or brown sugar (I use half maple syrup & half sucanat)
1/4 C vegetable oil (I use olive)
1 Tbsp kosher salt or 2 1/2 tsp table salt
1 tsp ground cinnamon (optional, but delicious)
1 Tbsp instant or active dry yeast
1 1/2 C whole wheat flour
4 C all-purpose or white whole wheat flour plus more (possibly. see below)


In a large mixing bowl or the bowl of your stand mixer, combine the water, oats, maple syrup or brown sugar, oil, salt, and cinnamon. Let cool to lukewarm, about 10 to 15 minutes. If you get as antsy as I do, stir a few times, but DO NOT add yeast until it's lukewarm. Too hot, and you'll kill your yeast.

Add the yeast and flours, stirring to form a rough dough. Knead (about 10 minutes by hand, 5 to 7 minutes by machine) until the dough is smooth and satiny. If you used maple syrup (or if it's a dry day), you will need to add extra flour a little bit at a time to achieve a nice texture and help the dough form a ball. When fully combined and you're kneading, the dough shouldn't be very sticky. You should be able to handle it without it sticking to your hands. I used half sugar and half maple syrup and added an additional 1/2 - 3/4 cup of flour.

Remove the dough from the bowl, scrape any remaining dough from sides, mush into dough, and form into a ball. Place dough in the bowl upside down (seam side up), and then flip it over so the seams are on the bottom. This way, you've easily coated the surface with the oil. Cover the bowl with lightly greased plastic wrap (or a shower cap. That's my favorite method), and allow the dough to rise for 1 hour. Since the dough is warm to begin with (from the boiling water), it should become quite puffy.

Gently punch down the ball, divide the dough in half, and shape each half into a loaf. Place the loaves in two greased 8 1/2" x 4 1/2" bread pans.

Cover the pans with lightly greased plastic wrap (again, or a shower cap) and allow the loaves to rise until they've crowned about 1" over the rim of the pan, about 60 to 90 minutes.

Bake the loaves in a preheated 350°F oven for 35 to 40 minutes, tenting them lightly with aluminum foil after 25 minutes to prevent over-browning. Remove them from the oven when they're golden brown and the interior registers 190°F on a digital thermometer. A more traditional (if less scientific) way is to tap on the loaf on the bottom - it should sound hollow. The sides should also be pulling away from the sides of the pan.

Turn the loaves out onto a rack to cool. Store at room temperature, well-wrapped, for several days; freeze for longer storage.

Monday, May 12, 2014

Fresh Pea Hummus - vegan & gluten free

Fresh Pea Hummus, vegan & gluten free

Hello and happy Monday! I hope the mommas out there had a good Mother's Day and felt loved and appreciated. Maybe you got a pasta necklace? or perhaps a fill-in-the-blank poem? My cousin got one that included a line about her smelling like jelly beans. That was my favorite part.

vegan/gf Fresh Pea Hummus

Now that we're fully into May, I hoping more of you out there have access to a nearby farmers' market. Perhaps you got a chance to go this weekend? (here are my top ten tips for having a great farmers' market experience) I have year-round ones available on Saturdays, but a local Thursday night one runs May-September only, and I got a chance to go for the first time last week. It felt so nice to be back! I got to check out my favorite farms and see the new booths. I learned that it's going to be a very short cherry season this year (#sadface) because winter here in the Bay Area was so weird (i.e. warm and dry). I forgot to ask if the same would be true of stone fruits like peaches, but I'd like to find that out this week (otherwise, I'm going to obsess about it, since we all know I'm somewhat in love with peaches). 

vegan & gluten free Fresh Pea Hummus

Anyway, among my purchases were my first peas of the season. Now, some people (ahem, mom.dad.) may express surprise at this since growing up I showed very little interest in peas. And I admit that they are still not my favorite vegetable in the world, but I've learned that fresh peas are dramatically better than frozen. They're sweet and tender and taste, well, pretty good. I like them raw in salads, mashed up into pesto, or, now, smooshed into hummus. Can you call it hummus if there are no garbanzo beans? 

Fresh Pea Hummus - vegan & gluten free

This hummus is fast, easy, and you don't even need to turn on the stove. It's great with chips or as a sandwich topping. It's easily double-able, and if you don't have quite the right amount of an ingredient, don't sweat it. You can make it anyway, and it will still be tasty. 

Fresh Pea Hummus - vegan & gluten free
adapted from Whole Living

I think this would be good with several other variations, including using mint (or parsley or basil) instead of cilantro, or increasing only the volume of peas so that you taste them more. It's also tasty with roasted garlic in place of the raw. 

I found I didn't need to because my peas were fresh & tender, but should you wish to cook your peas, bring a small pot of salted water to a boil. Add peas and cook until tender, about 2 minutes. Drain, then run under cold water or put into ice bath to stop cooking.

1 C fresh shelled peas
1/4 C fresh cilantro
2 Tbsp tahini
2 Tbsp lemon juice
1 small clove minced garlic
1/8 tsp ground cumin
pinch of salt

In food processor (or blender), pulse peas, cilantro, tahini, lemon juice, garlic, and cumin 30 to 40 seconds. Season with salt to taste.

Tuesday, May 6, 2014

Banana Bread Granola – vegan, gluten free & refined sugar free

vegan & gluten free Banana Bread Granola

This granola, man, has it been weighing on me. It took me several tries over the course of several weeks (months!) to get it right. I think it was actually cold out when I started this experiment. hmmm

Banana Bread Granola - vegan, gluten free & refined sugar free

Nevertheless, I'm so glad I plodded along. It was such a tease - the idea of it, the smells emanating from the oven, and then the taste, not quite right. But I persisted (and ate some burned granola along the way), and this weekend's batch confirmed my last recipe test and proved blog worthy.

Banana Bread Granola - vegan, gf, and refined sugar free
Banana Bread Granola

Dear readers, believe me when I tell you: go make this. You won't be sorry. It's excellent, quick and easy in the morning with almond milk, and it's also pretty great as a snack. There's no refined sugar (unless you so choose), and it's full of whole grain, protein, fiber, and omega goodness. Perhaps you have a trip in your future? It packs well and will not earn you a glare or a pat down at security. They might be jealous, though.

vegan, gf Banana Bread Granola


Banana Bread Granola – vegan, gluten free & refined sugar free
adapted from Minimalist Baker

Below is what I use but feel free to pick and choose your add-ins or come up with some of your own. The various seeds and the wheat germ are completely optional, but I include them for nutrition. The sugar? Doesn't need it one bit. I argued with myself, but ultimately left it in the ingredients list so you can make your own decision. To start, you could try just 1 or 2 tablespoons. I also never needed to add in the extra tablespoon of liquid sweetener. As for oil, so far I like coconut oil best, but olive oil also works has the added bonus of not needing to melt. The recipe should work with just about any kind of oil you prefer; it's really just a matter of taste.

3 C rolled oats (GF for gluten free eaters)
¾ C walnuts
½ C pecans (I’ve also used hazelnuts)
3 Tbsp raw sugar (totally optional)
½ tsp sea salt or ¼ tsp table salt
1 Tbsp cinnamon
¼ tsp nutmeg
1 Tbsp flax seed
1 Tbsp hemp seeds (optional)
1 Tbsp wheat germ (optional – skip for gluten free)
¼ C coconut oil (see note)
1/3 C + up to additional 1 Tbsp maple syrup, agave or honey if not vegan
1 tsp vanilla extract
1 medium ripe banana, mashed (~1/2 cup)


Preheat oven to 275F.

Using a large spoon or spatula, mix the oats, nuts, sugar if using, salt, cinnamon, nutmeg, and any seeds/wheat germ you're using together in a large bowl. If there's a fine coating of cinnamon on everything, it's well mixed.

In a small saucepan over medium low heat (or carefully in the microwave should also work), warm the coconut oil, maple syrup (or agave or honey) and vanilla extract. Once liquidy, remove from heat and whisk in banana puree until well combined. Pour over the dry ingredients and mix well.

Spread the mixture evenly onto one or two baking sheets (I lined mine for easy clean up, but Minimalist Baker did not) and bake for 75-90 minutes, gently turning occasionally, until golden brown and nearly crisp. I like to crack open the oven door now and then to let out some of the steam (accumulated moisture). I don’t know if doing so helps the granola crisp up faster or not, but it feels like it should.

Once the granola is visibly browned, remove from the oven and gently toss just a bit to let the heat escape. Cool completely (it will crisp up as it cools) on the baking sheet or in a heat-safe bowl. Store in a container or jar with an air-tight seal – it should keep for a couple weeks.

Wednesday, October 9, 2013

Bourbon Pumpkin Muffins - vegan

Bourbon Pumpkin Muffins

I hope you're not over pumpkins yet.

I know, I know, this is the third pumpkiny recipe in a row here, and for that, I sort of apologize. If you need some balance in your life, I did recently give you a salad, and before that, granola, both of which are quite healthy and a good antidote to overindulgence. (by the way, have you tried the granola yet? as part of my plan to convert everyone I know to homemade-granola-makers, you really should)

But I don't apologize all of the way, because when, if not in October, are you going to overindulge in pumpkin anyway? September's not the season quite yet, and November is Thanksgiving focused, so that leaves (pun intended) October as The Time of Pumpkin. I'm keeping you trendy. You're welcome.

Wednesday, September 4, 2013

Medium-Big Cluster Maple Granola - gluten free & dairy free

Medium Cluster Maple Granola

I've never been what anyone would call a "trend-setter." I couldn't tell you what this year's New Black is, though I do happen to know the Pantone color of the year. I wear heels as few times per year as possible, and I blow dry my hair even less often. I don't own anything ombre. I refuse to make Instagram videos, and the rugs at Chez Sweets tend to fall into the washable-because-we-have-dogs-who-vomit category rather than the chic-and-trendy one.

Thursday, November 29, 2012

Pumpkin Pie Muffins - vegan

Pumpkin Pie Muffins - vegan

Whew. It turns out that a busy bakery turns into chaos during Thanksgiving week. We sold hundreds! thousands! millions! of pies. I couldn't actually believe we would sell all of the ones we had ready, but we did, and we actually sold out of some flavors. 

By the end of my shift on Thursday, I was done in. So much so that, for the first time in my life, I brought a cake to dinner that I bought. I was mildly outraged at myself, but so tired that I couldn't sustain it. Also, I justified it by telling myself that it was a cake we make in the bakery, so it's almost kinda-sorta like homemade. Right? 

Thursday, November 15, 2012

Pumpkin & Spice Overnight Oatmeal - vegan & gluten free

Pumpkin & Spice Overnight Oatmeal

I've started having dreams about work, which clearly means I'm there a lot (have I mentioned I'm finally full time?) and it's busy. You might have heard that Thanksgiving is next week. And you might see the connection between Thanksgiving and a very busy bakery.

My most recent nocturnal adventure had me worried all night about not having enough stuffing. You see, we make unseasoned bread stuffing from our stale (day old) bread, and apparently last year we sold hundreds and hundreds of pounds of it. It's somewhat time consuming to make, and with so many other things on my Must Make NOW list, turning loaves of bread into sort-of-but-not-really-cubed-shaped-pieces often gets pushed to the end of my shift. Which means I'm rushingrushingrushing and never ever make as much progress on my pile of bread as I'd like to, which seems to lead to bread nightmares. Life is hard.

Saturday, June 23, 2012

Pasta with Pea Pesto - vegan & gluten free

IMG_2685
Surprise! A weekend post, because I love you. And because this week was somewhat lame, blogging wise.

Last Saturday, for the first time in quite awhile, I was able to go to my current favorite farmers' market. The changes since my last visit (a month ago? maybe 6 weeks?) were pretty astounding. Summer's bounty is certainly upon us. There was a very long line of people waiting to buy the first local corn of the year; lots of stands had tomatoes for sale, not just the one farm with a greenhouse; raspberries and blackberries are in; sweet pea bouquets provided a cheap pick-me-up.

There were also peas for sale. You know, the kind that come in pods, not the frozen section of your grocery store. Growing up, friends and family will attest, I was not a fan of peas. I don't know if I ever refused to eat them (which was rarely an option anyway), but I certainly ate them under duress.

Monday, April 23, 2012

Keeping it Green


Happy Monday! I hope you and yours had a good weekend. It was gorgeous here, and I did everything on my list.

As you may know, it was Earth Day yesterday. I know lots of towns had recycling drives, fairs, and rummage sales. I figured this was a good time to share some more of what Mr Official Taster and I do in our lives to be green. I also wrote a pretty extensive list last month.

  • I mentioned last month that most of our cleaning products were weird-chemical free, and this spring, I've been slowly replacing our personal care products as we run out. By "personal care" I mean toothpaste, facewash, bodywash, shampoo, etc. I especially love my new Avalon Organics facewash. It smells great, and I only use a tiny amount (a dollop maybe the size of the head of a thumbtack?) because it lathers up into more than enough.
  • A lot of people use reusable shopping totes these days, but I also reuse plastic produce or bulk bags (within reason). If they need it, I give them a quick rinse when I get home from the store, allow them to dry, and then stuff them back into a shopping bag. It doesn't slow me down at the store, and bags that hold rice or apples don't get that dirty.
  • Plastic bags get recycled. Every grocery store, and a good amount of other types, has a bin near the front somewhere where you can recycle used plastic bags. I let mine collect for a while, and then drop them off once or twice a year. The hardest part is remembering to bring them from the car into the store.
  • I said it before, but I'll say it again: Farmers' Markets. Not only are you getting delicious, local, fresh and often organic products, but the farmers get your money directly. No middlemanperson gets a cut, so families doing the work get a better deal. Find one near you here.
  • Take advantage of your grocer's bulk section if available. I find some products (though not all) to be cheaper than their packaged version, but I really like being able to get as small of an amount as I want. For example, I get pine nuts in bulk because pesto only uses a third of a cup. I just get what I need, and I don't have to worry about the remainder becoming rancid. (and pine nuts are waaaay to expensive to waste!)
  • Speaking of waste, I've been trying to cut back on food waste. If we don't finish our fresh strawberries before they start to turn, I'll hull them, lay them out on a lined baking sheet, and freeze them. Once frozen, they can all live together in a ziplock bag, but spreading them out lets them freeze individually instead of in a big clump. They'll be great in smoothies! When Mr OT tried a new recipe a few weeks ago, he bought some fresh basil. It didn't all get used up before the leaves started to wilt, so I made some pesto and froze it. Find yourself with some stale bread? Give it a whir in a food processor for breadcrumbs. A little creativity and foresight can save a good amount of dough down the line. 
  • Walk or bike when you can. I understand it's not always feasible, and although my new job is probably close enough to bike (with a little conditioning), I would be terrified to do so. The route there just doesn't feel safe. However, I never let myself drive to the library. It's a rule. 
  • Finally, and the least palatable: we pick up after our pups every. single. time. Poop that's left can really contaminate our water supply, so we always take the extra 5 seconds to scoop.

That seems like a lot, but it's really only a small effort on our part. What are some of the things you do to stay green year-round?

Tuesday, March 20, 2012

Refresh & Rethink


Happy Spring! I hope it was a beautiful day in your neighborhood. Spring is often seen and felt as a time for resolutions, cleaning out, and starting anew. While Earth Day isn't for another month, some people use the first day of Spring to celebrate too.

As I've said before, I think you are all smart people and you know this stuff. But maybe, just maybe, seeing it again will inspire you to green your routines a little more. Obviously, this list is a minuscule piece of the puzzle, but then again, every little bit helps, right? Here's some of what Mr Official Taster and I do to keep ourselves, the puppies, our bank account, and the planet a little healthier.
  • I would estimate that 90% of our laundry is air dried, on a drying rack, sans dryer, either on our balcony or tucked into a corner of the living room. While this means all of our household laundry cannot get done in one day (because it wouldn't all fit on the rack), we use way less energy. Shower rods also work great, as would a suspension rod somewhere out of the way (you could either leave it in place, or take it down when there's nothing to dry).
  • In that same vein, almost all laundry here at Chez Sweets is washed in cold water. Bedding, both human and canine, gets hot water because it helps eliminate allergens. I don't notice a difference in cleanliness, and I know that it both keeps our energy bill down and helps extend the life of some fabrics.
  • Our soaps, detergents, and other cleaning products tend to be Seventh Generation, Mrs Meyers, or in-house, weird-chemical-free brands from places like Whole Foods and Trader Joe's. The less chemicals, the better, for us and the puppies. I've never used bleach, fabric softener, or dryer sheets as part of my laundry routine, so "giving them up" isn't so hard for me.
  • As many dishes as possible go in the dishwasher, which is more efficient than I will ever be. They get air dried - I think all dishwashers let you choose whether to heat or air dry. Only wine glasses (they don't fit) and our pots & pans get hand washed. 
  • We don't use air fresheners or candles, so that's less chemicals in our indoor air. We also have a few houseplants that help clean our air (ours were chosen for looks, but there are specific varieties that work best).
  • Recycle, recycle, recycle. Whether it's tomato cans (how-to coming soon!) or wine boxes turned planters, printing on the backs of old paper (only Important stuff gets new, unadulterated printer paper), or storing bulk foods like chocolate chips or quinoa in old glass jars, we really try to get the most use out of everyday items. If we're done with something and it's in reasonable condition, it goes to a local thrift store. Of course, we also put everything our county lets us into the recycling bin.
  • One of the items I looked forward to registering for the most when we got hitched last year was a set of glass storage containers. It's a weird wish, I know, but I love them! We don't have a microwave in this current home, but we have elsewhere and at work, so glass eliminates the dreaded heated plastic. Pro tip: you can write on glass with sharpie and it rises off quite easily in the normal course of washing. I often date our containers so I know what leftovers should be eaten first. It could also come in handy if you send leftovers home with a friend or take a food offering to a neighbor.
  • Our cookware also got greened as a result of us getting married. We bought our set, and it was a big investment, but I'm happy we did. We use Scanpan Professional Nonstick, which I've liked getting to know. The biggest downside is it's weight, which can be a pain while (hand)washing some of the bigger pots. The pros outweigh (ha!) the con, though, and I like that they are truly nonstick without added oil and are made PFOA (perfluoraoctanoic acid) and Teflon-free.
  • Farmers' Markets. Local, organic, sustainably grown food is a priority for us. Real Food as much as possible and an nearly-vegan diet. Sometimes the organic version of food is more expensive, but I think it's worth the price both now and down the line.
  • Reuseable shopping totes. Considering how often I shop for food, I can't even begin to estimate how many plastic or paper trees I've saved and how many bags I've kept from cluttering our homes just by remembering my bag(s). Many stores will give you a refund (anywhere from 3-10 cents per bag) on your total bill, which totally adds up. 
PHEW. That's kind of long, huh? Well, I hope it helps to inspire. What suggestions do you have? What are the top three things do in your home?

Friday, December 23, 2011

Sugared Cranberries - vegan & gluten free


Happy Friday! I hope you are surviving the week in relative good cheer. My parents arrive for a week-long visit tonight, and Mr Official Taster's side arrives tomorrow. We'll be feeding eight people for the Christmas holiday (we're having these for breakfast). I think it'll be fun!


If you are one of the people still scrounging around for gift ideas, here are a few gift worthy sweets and welcome additions to any party:
Peanut Butter Dog Treats (for your furry friend)
Freezer Burritos (especially for new parents or any other caretaker)


These cranberries are perfect for holiday gatherings. Not only are they vegan and gluten free, but they are free of just about everything, including fat. They also have a nice, refreshing "pop"when you bite into them, and aren't as sweet as almost everything else this time of year. The other handy thing about them is how little attention you can pay to them (mine actually soaked almost two days) and they stay good for a bit.

I think this will be my last post for several days (or a week). Best wishes to you and yours!

Sugared Cranberries
adapted from MyRecipes

2 C granulated sugar *
2 C water
2 C fresh cranberries**
3/4 C superfine sugar***

Combine granulated sugar and water in a small saucepan over low or medium heat. Stir mixture until sugar dissolves and water is steaming. Remove from heat. (Do not boil or the cranberries may pop when added.) Add in cranberries. Here you can either pour mixture into a bowl or simply leave it in the pot. Cover and refrigerate 8 hours or overnight.

Drain cranberries in a colander over a bowl (don't shake off excess liquid, as it helps the sugar adhere), reserving sugar water, if desired (I didn't know what to do with mine, so if you have ideas, please share!). Place some superfine sugar in a small zip top plastic bag. Add the cranberries, maybe 10 at a time, and shake them to coat with sugar. Spread sugared cranberries in a single layer on a baking sheet (no need to grease or line sheet). Let stand at room temperature 1 hour or until dry.

Store in an airtight container in a cool place for up to a week.

*I used superfine sugar here because, well, I had it,
**I used the what I had leftover from making these cookies, which was about 1/2 a bag. If you froze them, like I did, allow them to defrost before using them in this recipe.
***My there are a lot of stars for so short an ingredient list. Superfine sugar is available in the grocery store, and it usually hiding among the other sugars in what looks like a milk carton. I don't honestly know exactly how much I used, since I just dumped some in my plastic bag and added a little more when I was running out. But it wasn't very much

Tuesday, July 12, 2011

Simple Summer Supper - Vegan Avocado Sandwiches


It's summer (almost everywhere), so if it's too hot to cook, or you're too lazy tired after a long day, these no cook open face avocado sandwiches are a great solution. The best part is that you can pair the avocado with whatever you happen to have available. I combined mine with bbq sauce, hummus, and some romesco sauce.


Because there are so few of them, each ingredient really counts, so use good crusty bread and nice ripe, flavorful avocados.


These were really satisfying, especially when I followed them with the first peaches of the season. 

Friday, August 6, 2010

Pesto! Pesto! Pesto!

I hope you have an abundance of herbs right about now. It's that time of year, and so I put my basil to their most delicious use - pesto! It's very easy to make, freezable, and a great reminder of summer in February. I froze mine in an ice cube tray. That way, I can enjoy it in the exact portion I need. It didn't come out as cleanly as I wanted, so next time I'll try spraying the tray with cooking spray. Pine nuts are pretty pricey, so you can substitute walnuts or cashews. I hear spinach is good for you, so I added a couple handfuls. I can't taste, smell, or see a difference from other batches of pesto I've made. If you don't want to use spinach, though, just use more basil. Looking for a dairy free version? Just omit the cheese.

If you're anything like me, after you scrape the bowl clean with a spoon, you'll rip up a piece of bread to get the last drops.

Pesto
4 oz Romano or Parmesan cheese, cut into 1 inch pieces
3-4 garlic cloves
2 C tightly packed fresh basil leaves
2/3 C fresh baby spinach
1/3 C pine nuts
3/4 tsp salt
1/3 C olive oil

Using the metal blade of your food processor or blender, chop cheese and garlic. Add remaining ingredients, except olive oil, and process until combined, about 8 pulses. With the machine running, pour oil through feed tube. Process until combined. Scrape bowl and continue processing until smooth.


Related Posts Plugin for WordPress, Blogger...