Showing posts with label homemade. Show all posts

Tuesday, January 21, 2014

How to Spray Paint a Doormat

homemade spray painted doormat


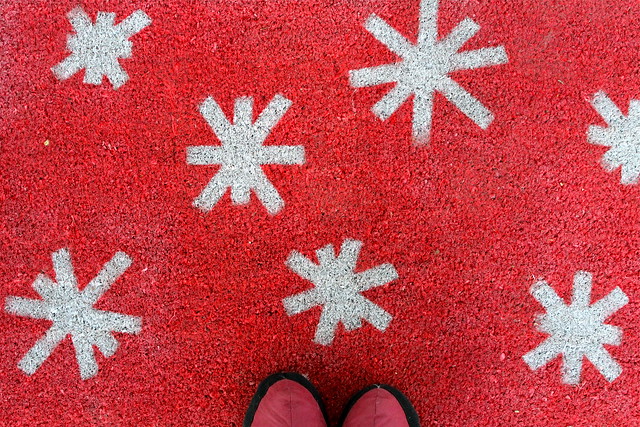
This was one of those posts that was supposed to be up last month, but since I didn't get it up then, you get it now. I was originally inspired by Young House Love to create my own winter/Christmas doormat for our new home. I wanted a bright red mat that spelled out "JOY." But you know what I learned? Js are really, really hard to make with painters' tape. So I went simpler, and I've still been happy with it. There's probably a lesson in there.

And although this was supposed to be a Christmas post, the you can use this technique to make a door mat for any season or event you'd like (or even no occasion). Add stems and a few leaves and this snowflake design turns into flowers. I think you could make firework-like bursts for the summer holidays or a sun. Birthday candles or a menorah would be pretty simple, and, excluding tricky letters like "J," spell out names, make a monogram, or try simple words. think: love, fall, boo. Stripes, chevrons, squares, crisscrossed lines/grid are easy straight-line designs. Of course, you could be fancier than painters tape and buy or make a stencil for more elaborate (or, ahem, curved) designs, letters, or even house numbers.

step one

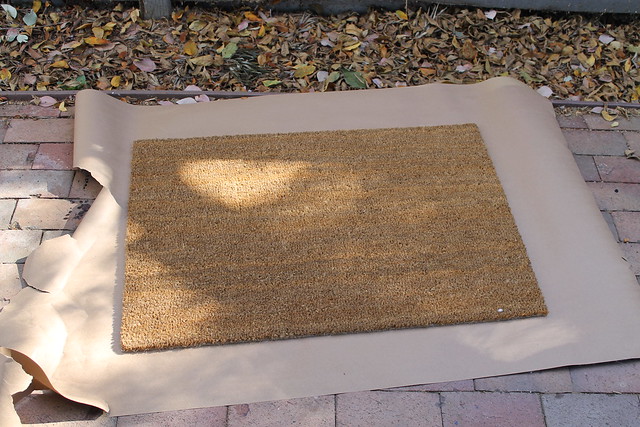
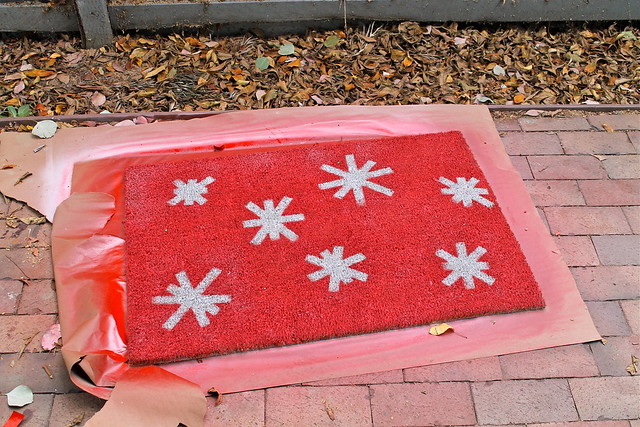
And it's easy. Get your spray paint. Make sure it's a good quality (not the $2 can please) and be sure it is for indoor and outdoor use. Otherwise it won't hold up. I used Rustoleum. Start with a blank mat. I picked mine up at IKEA, but they have similar ones at home improvements stores, as well as places like Target or Home Goods. On a dry, non-windy day (double check your paint can for temperature requirements), spread your mat out on a surface you don't mind getting paint on (like a lawn) or protect your work area with craft paper or newspaper.

step two of how to spray paint an IKEA doormat

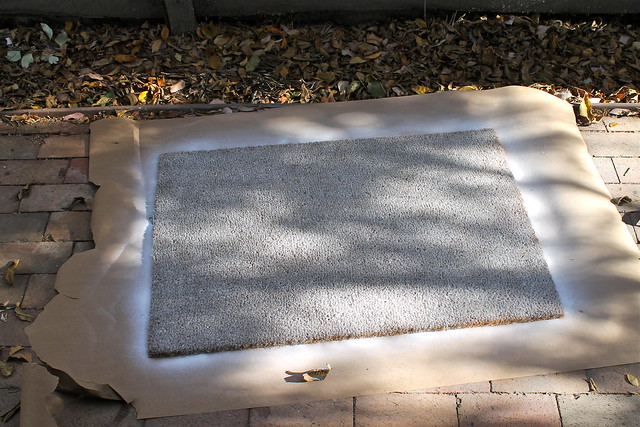
If you're using two different colors, spray your "under" color (in my case white) evenly over the entire surface. It will take you a few passes to make sure you have even coverage. Take your time, but don't worry if it's not perfect.

of how to spray paint a door mat

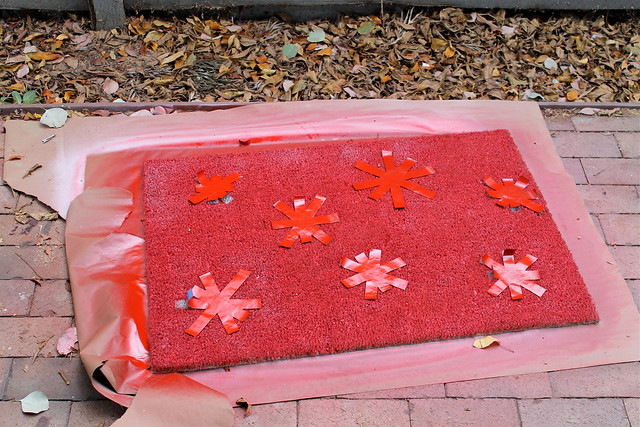
Follow the directions on your spray paint for drying time. I waited a full 24 hours. Tape off your design. I just eyeballed it and tried to make all my snowflakes a little bit different and all slightly different sizes. Remember, the parts you are taping will remain the under color. Be sure to press firmly, especially around the edges for crisp lines.

step four: completed door mat

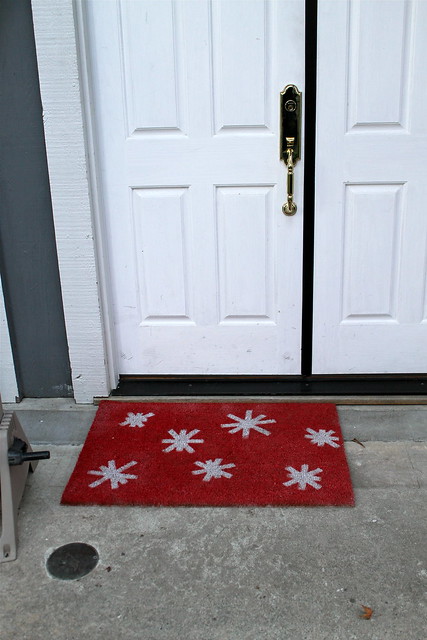
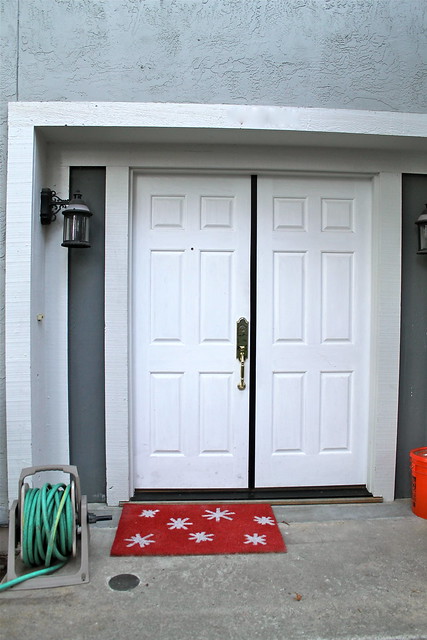
Spray on your top coat. Again, go for even coverage. It's better to go light and have to go over the area another time or two than just pour on the paint. Wait for the paint to fully dry (I waited another 24 hours). Remove painters tape and enjoy!

DIY spray painted door mat

Since we don't have winter weather here in sunny California, my mat didn't have to hold up to rain or snow, but according to Sherry and John, theirs did.

spray paint your doormat

Have you ever made one of these? What design did you create and how did it hold up?

Thursday, August 11, 2011

DIY Paint Chip Canning Labels


I mentioned the other day that I was canning this week. I did! It was fun! For inquiring minds, I made both Raspberry jam and Peach Melba jam, which is a pretty (and hopefully delicious) combination of peaches and raspberries. I've been using Well Preserved, which I like because it deals in small quantities, unlike the classic Ball book, which I also have.


These cute 4oz jars of raspberry jam are earmarked as gifts, so I wanted to dress them up a little. Apparently, these crafts got stuck in the back of my brain, so I took a trip and found samples that were both good colors and good names. The good names part was important for the fun part.


A shot glass is the perfect sized circle to trace, so traced circles onto the chips so that the names would be included, cut them out, and glued them to the lids. If I was fancy, I would have something like this to speed up the process. But cutting out circles while watching a movie was a pretty good time. 


Anyway, I'm pleased with how they turned out, and I think they look pretty all together.


How do you like to dress up gifts?

Wednesday, December 8, 2010

DIY Kitchen Gifts Round Up #2


This simple wrapping idea comes from Real Simple. Just use bowtie pasta to dress your packages!

Brown Sugar Scrub from Craft

Dish Cozy, also from Craft. I know it's not edible, but it's kitchen-useful!

Glass Painting: tumblers from Young House Love. Same caviat, kitchen-related!

40 Edible Gift Ideas from The Kitchn


Snowflake Ornaments from Katy Elliot

Homemade cat and dog treats from Re-Nest

Vegan Gingerbread
DIY not your style? Head on over to Short & Sweets for some inspiration. Get your order in early! My last day to ship for Christmas is Monday, December 20.

Friday, November 26, 2010

Round Up of Kitchen Gifts

While many people choose to wake up early, stampede into stores, and wait in line to pay for their bargains, my plan for Black Friday is always to stay inside. Avoid driving anywhere if possible, and, no matter what, avoid the mall. I like to give homemade gifts when I can and when I think they are a good match to the recipient, and usually my homemade gifts are in the form of food. It only makes sense for people like us- those who read and write about food, like cooking, and are even pretty good at it. So for our own short and sweet Black Friday, I have a round up of ideas for holiday gifts from your kitchen. Bon appetit!

First, the obvious, Short and Sweets

From Real Simple

From The Kitchn

From Craft


Paperwhites from NadiaKnows


Edible ornaments, boxes, votives, placecards, etc. from King Arthur Baking

Canned Apple Pie Filling from Skip to My Lou

Pie in a Jar (many places to find this one) here from Not Martha

Orange Marmalade from Evil Mad Scientist Laboratories


All the In A Jar Recipes you could ever want

And for a little humor, what NOT to get the cook on your list

Paperwhite photo courtesy NadiaKnows

Tuesday, November 23, 2010

Vegan Ginger Chocolate Chip Bars

If you're looking for an alternative to pumpkin pie this Thanksgiving, I think this is a good option. Or at least a good second or third dessert to have on hand! It's simple to put together, minimally messy, and everyone who has tried it likes it. You should also add it to your list of possible edible gifts for the season (stay tuned: I have a good collection of those coming soon!)

Speaking of edible gifts, I reopened my Etsy store this week!

Vegan Ginger Chocolate Chip Bars
cooking spray
1 C (2 sticks) vegan butter
2 1/4 C all purpose flour
2-3 tsp ground ginger
1/2 tsp cinnamon
1/4 tsp ground cloves
1 tsp baking soda
1 1/4 brown sugar
1 1/4 sugar
1 C silken tofu, pureed in food processor or blender
1 tsp vanilla
12 oz semisweet chocolate chips

Preheat oven to 350 degrees F. Spray a 9x13 or 8x11 baking pan and line it with parchment paper, leaving some overhang.

With an electric mixer, cream the butter and sugars until fluffy. Add the tofu and vanilla and beat to combine. Gradually add spices and flours, mixing until just combined. Add the chocolate chips and mix with a spoon or spatula (if you're using a hand mixer, the chips will make the batter too tough for them to handle)

Spread the batter evenly in the prepared pan and bake until a toothpick inserted in the middle comes out clean, approx. 40-50 minutes. Allow to cool completely in the pan before cutting into bars.

Notes:
If you want a strong ginger flavor, use the larger amount in your recipe.

You can freeze the unbaked batter in the pan for up to 2 months. To bake, follow the recipe instructions and aim for the longer bake time.

Friday, September 24, 2010

Pesto Ricotta Ravioli

If the thought of making homemade ravioli intimidates you, read on. If not, read on anyway. It might be fun.

Saturday was a gorgeous day and the perfect afternoon for the weekly farmers' market. The one closest to me is literally down the street, about 5 blocks away, and happens twice a week. Good deal! Unfortunately, Wednesday afternoons I'm tied up at school, but Saturday afternoons usually work out. This week, Official Taster and I walked away with tomatoes, oranges, scallions, corn, grapefruit, and plums for a grand total of $12.50. I was able to put the corn, tomatoes, and scallions to work right away, and I'll be posting that recipe in the next few days. (It was fantastic. Be sure to come back for it!)

Anyway, back to ravioli. I wanted to make some, but I also was a little wary. So I got some won ton wrappers at the grocery store (they're in the refrigerated section) and used those to wrap up some ricotta-pesto goodness. After I made about 30, I froze them to help them keep their shape during the cooking. The ones I didn't cook are still in the freezer, and should be good for quite a while. I discovered that making ravioli this way is still time consuming, but probably less than making the pasta from scratch, especially since I don't have a ravioli maker. Official Taster thought the texture of the won ton was a little odd since he's used to won tons being fried, but I thought they turned out well. I might try steaming them next time instead of boiling them because they were very sticky once drained. I had to be very careful removing them from the colander and getting them to plates. The pesto sauce you see in the bottom photo? That's actually the insides of a couple ravioli that broke as I tried to unstick them.

Pesto Ricotta Ravioli
1 package won ton wrappers, found in the refrigerator section of the grocery store
1 C ricotta cheese
3 ice cubes worth of pesto, at room temperature
2 garlic cloves (optional)
1/4 C romano cheese (optional)
salt

1. Line 2 baking sheets with parchment paper. Stir together ricotta cheese, garlic, romano cheese, pesto, and sprinkling of salt.
2. Place 1 won ton wrapper on your work surface, spoon some of your mixture (approx 1 Tbsp) in the center of wrapper. Use your finger to brush water onto the edges, fold wrapper in half and line up edges, and pinch to seal. Or use a second wrapper instead instead of just one folded. Repeat with your remaining ingredients. Arrange in a single layer on your baking sheets and freeze at least 30 minutes.
3. Bring a pot of salted water to boil. Add ravioli- stir to help keep them from sticking. Cook about 2 minutes, or until tender. Drain, serve, and enjoy!

Notes:
I didn't make a sauce to go with these since I just used the insides of broken raviolis to spread over the top. This recipe is easily variable- just omit the pesto and add a different tasty amendment. If I were to make a sauce for this, I would choose something light that doesn't overpower the pesto taste. Experiment and let us know your results!

Frozen, uncooked ravioli can be stored for up to a month

Friday, August 6, 2010

Pesto! Pesto! Pesto!

I hope you have an abundance of herbs right about now. It's that time of year, and so I put my basil to their most delicious use - pesto! It's very easy to make, freezable, and a great reminder of summer in February. I froze mine in an ice cube tray. That way, I can enjoy it in the exact portion I need. It didn't come out as cleanly as I wanted, so next time I'll try spraying the tray with cooking spray. Pine nuts are pretty pricey, so you can substitute walnuts or cashews. I hear spinach is good for you, so I added a couple handfuls. I can't taste, smell, or see a difference from other batches of pesto I've made. If you don't want to use spinach, though, just use more basil. Looking for a dairy free version? Just omit the cheese.

If you're anything like me, after you scrape the bowl clean with a spoon, you'll rip up a piece of bread to get the last drops.

Pesto
4 oz Romano or Parmesan cheese, cut into 1 inch pieces
3-4 garlic cloves
2 C tightly packed fresh basil leaves
2/3 C fresh baby spinach
1/3 C pine nuts
3/4 tsp salt
1/3 C olive oil

Using the metal blade of your food processor or blender, chop cheese and garlic. Add remaining ingredients, except olive oil, and process until combined, about 8 pulses. With the machine running, pour oil through feed tube. Process until combined. Scrape bowl and continue processing until smooth.


Sunday, July 11, 2010

Vegan & Gluten Free Apricot Blackberry Crisp

I hear that it's hot. It may have been mentioned once or twice by family, friends, and the news. However, it is far from hot here in supposedly-sunny Southern California. All week it's been cool, cloudy, and even a little rainy. In fact - and some of you will have trouble believing this - I was wearing corduroys and fleece this week. For real. Multiple days. The result? I keep craving warm comfort food even though it's July and I'm sure most of you out there aren't in the mood for warm food. Or using an oven.

So, I apologize. This delicious crisp uses the oven, but you can turn it on and go away for a while, so maybe it's not so bad? In any case, I think it's worth it. Fresh fruit crisps are one of my favorite desserts. Some of them may even beat out some chocolate recipes. Part of the appeal, I believe, comes from their limited make-ability, like gingerbread or s'mores. These crisps are really only best when the fruit is at it's peak. When you've just picked it up at the farmers' market because you just couldn't resist. When each fruit is equally fragrant and flawless. When you can't possibly eat the 3 pounds of apricots you brought home.
Some of you may remember the Apple, Blackberry, & Strawberry Crisp I wrote about in April. That was a vegan recipe, but I've upped the ante and created a vegan and gluten free crisp! For this one, I used the same Sorghum Blend (mix of sorghum flour, potato or corn starch, and tapioca powder) I used in the Patriotic Cupcakes. If you made a full batch for those, you should have enough left that you don't need to mix up more. Don't need to worry about gluten? Just use an equal amount of all-purpose flour instead. Likewise, regular rolled oats work fine. Certified gluten-free oats are important to people with Celiac disease because regular oats can be contaminated with gluten from the fields, processing plant, etc. Finally, I think this is delicious as written. Official Taster thinks it's a little tart. So maybe add a bit more sugar if your taste buds swing that way.

Vegan & Gluten Free Apricot Blackberry Crisp
2 lbs ripe apricots, quartered and pitted (about 12)
8 whole almonds
1 C packed brown sugar
2 tsp cinnamon
6 oz blackberries (1 clamshell)
1/2 C Sorghum blend
1/2 tsp nutmeg
6 Tbsp chilled vegan butter, cut into 1/2" pieces
1 C gluten-free rolled oats

1. Preheat the oven to 375 F. Place the apricots in a baking dish. I used a 9" glass dish.
2. In a food processor, grind the almonds with 1/4 C brown sugar, and 1 tsp cinnamon for about 30 seconds, or until it's a fine mixture. Scrape this sugar mix over the apricots and toss. Scatter berries across the top.
3. Combine sorghum blend, nutmeg, remaining 1 tsp cinnamon, and butter in a food processor, with several on-off pulses or only until the mixture looks like a coarse meal. Add the oats and pulse a few more times to break them up.
4. Spread topping over fruit. Bake for 45 minutes or until top is golden brown

Tuesday, July 6, 2010

Weekly Menu Free Download

Today I'm linking you over to Ollibird for a free download! This graphic is perfect for you to print out and place inside a picture frame, kind of like this fun craft. Then you just hang it in your kitchen (or anywhere else you'd prefer) and write on the glass like a whiteboard. Wipe it off at the end of the week to plan again! She's also got a couple links to other downloads she sells on Etsy.

I'm thinking this might also make a great gift for newlyweds or as a housewarming present. You just have to pick a nice looking frame, and maybe wrap it in a pretty kitchen towel. Cute and useful!

This home is not great at weekly menu planning, but it's something I would like to be able to say I do. Do you plan your dinner menus a week at a time? Have you found that it helps with shopping, meal variety and creativity, or trying new recipes? Let us know!

Thursday, June 24, 2010

$2 Pretty Project

Do you like lists? I do. A lot. But at least I don't make lists of my lists. The only downside? I constantly have little pieces of paper floating around. This project helps fix that!

When I saw this post on paper n stitch a couple weeks ago, I had one of those *slap on the forehead* "Duh!" moments. Why haven't I thought of this before?!

I didn't have a scrap of paper or fabric an appropriate size, so I went to my favorite thrift shop and found a lovely embroidered linen for $1. I have no idea what it was originally intended for (tabletop decoration?), but I love how it looks in my $1 garage sale find. Mom will be proud.

The only real change I made to the original tutorial is that I stapled the fabric to the cardboard in the frame instead of using tape. Now it's hung (please don't blame the paint color on me. I rent) and I can leave helpful To-Do lists for Official Tester, er, me.

Saturday, June 5, 2010

Basil and Garlic Marinade

Visiting the farmers' market inspired grilled vegetables for dinner, but I wanted to do something more exciting, so I made this pretty darn delicious marinade. Part of the reason I wanted to marinate the veggies is that Official Taster and I don't always see eye to eye on which vegetables taste good. Mostly he likes things that I don't, like eggplant. and squashes. So I'm hoping this concoction (I'm writing as it's working it's magic) will help me....appreciate....the yellow squash and Japanese eggplant we picked up this afternoon. Also included: tofu, green pepper, and onion. I'll add in heirloom cherry tomatoes when we skewer everything.

As usual, please consider this recipe to be a guide, not anything set in stone. However, I would keep the proportion of oil to vinegar at about 2:1. I used avocado oil because we had just enough left, I think it works better for the high heat of grilling than olive oil, and it's something pretty readily available here in Southern California. Certainly olive oil would also work. I really like balsamic vinegar, so I chose that, but rice, wine, apple cider, etc vinegar would also work, as would lemon, lime, or another citrus juice. It just depends on what flavor you're aiming for. Fresh herbs are also up to you. I happen to have some basil growing outside my front door, so that's what I picked. Maybe later in the summer when I have more mature plants I'll try my rosemary. Also, I really like garlic, so if you don't like it as much, lessen the amount you use, because, as written, this is very garlicy.


Marinade
1/2 C avocado oil
1/4 C balsamic vinegar
8 cloves of garlic
1/4 C loosely packed basil leaves
salt and fresh ground pepper

Smoosh, chop, dice, or press your garlic. Chop or tear up the basil. Combine all ingredients, preferably in a jar with a lid so you can shake them up well.

Pour over veggies, and let them marinate for a while. Stir occasionally.

Because I'm not marinating meat, I can use the marinade again while the veggies are grilling by brushing it over them, and again over the rice I'm serving them with.

Monday, May 10, 2010

Vegan Veggie Pot Pie

I don't know about you, but I have a weakness for bakeware. It's kind of a problem because everywhere I shop I see dishes I want and imagine things I can make in them. I'm pretty good at resisting the siren call, especially for things that only make one dish or take up a lot of room. However, the other week I found myself with a gift card at a discount home store and found this pretty pie dish that called out to be set on the counter with delicious smelling steam rising from it. So I bought it. And a cookbook.
But I didn't get so many other things!

Tuesday, April 27, 2010

Easy Strawberry Jam (for real)

'Tis the season for excess fruit! With all the bounty that's starting to appear at farmers' markets and in grocery stores, if you're anything like me, you're seduced every time you shop and end up with more than you can eat or bake. That's where jam comes in handy! Freezer jam, that is. It doesn't involve canning and you can do small batches. It stays good for up to a year (6 months according to some) in the freezer and for about a month in the fridge.

Monday, April 12, 2010

Vegan Apple, Strawberry, and Blackberry Crisp

The farmers' market was a success! Even though it was cold and cloudy (yes, really) and I couldn't find what I specifically was looking for, I did find the makings for a delicious vegan fruit crisp. Crisps are definitely one of my favorite desserts, and sometimes I even like them better than cake (shh don't tell my mom). They are easy to put together, don't get lots of stuff dirty, and taste good pretty much no matter what. Exact measurements aren't as critical as in cakes, either. And, so, without any further ado:

Monday, April 5, 2010

No Knead Bread

No knead bread. Sounds suspicious, I know, but hear me out.

While visiting the parents this weekend, I had lots of trouble sitting still and not baking. I was perusing their extensive magazine and cookbook selection and came across a new one- My Bread by Jim Lahey. It's relatively new, and so is his technique:

Combine flour, yeast, water. Let rise for 12-18 hours. Poke it a little bit and let rise for 2 hours. Bake for 1 hour.

That's it. Seriously.

Monday, March 29, 2010

Summerlike Sunday - Vegan Grill Pizza


Yesterday felt very much like summer here in sunny San Diego, with hot temperatures and cool breezes, jeep rides, and beach visits. I understand that it's not like that everywhere this time of year, and I apologize; I don't mean to rub your face in my perfect weather. After an afternoon visit to the beach with the dogs, Official Tester and I decided on Grill Pizza. That way, he could do the manly grill thing, we could eat tasty food, and I could tell you about it. Grill pizza is surprisingly easy and only takes a few hours of planning ahead time (for the rising). I got the original recipe from Cuisine at home magazine last summer, but I've noted my slight modifications.


PIZZA DOUGH
This recipe makes four 12" pizzas (I should have only made half for 2 people)
1 C warm water
1 Tbsp sugar
1 pkg (1/4 oz) active dry yeast (2 1/4 tsp)
2 1/4 C all-purpose flour [I used a combination of King Arthur whole wheat and Trader Joe's white whole wheat]
1 C cake flour [when I made this before I used all-purpose here. This time I used cake flour and I think it rolled out better]
1 Tbsp kosher salt [I thought the dough was a little salty. Official tester did not. So it's up to you]
2 Tbsp olive oil
[I also added a handful of ripped up fresh basil leaves. Dried herbs work well too]
[cooking spray]

1. Combine water, sugar, and yeast. Proof until mixture turns foamy, about 5 minutes.
2. While that's going, mix flours and salt in a medium bowl (or bowl of stand mixer fitted with dough hook).
3. Add oil to proofed yeast mixture and pour into flour mixture. Mix until combined with a spoon/your hands (or mixer)
4. Turn dough out of bowl onto lightly floured kneeding surface. Kneed dough for about 10 minutes (with mixer, still 10 minutes, on low speed). Dough should not stick to counter/bread board and should be somewhat "springy" by the time you're done. Gather into a ball and pull the dough on top around and down so that it's tight on top and pinched closed on the bottom.
5. Lightly spray the same medium bowl with cooking spray. Put the ball of dough in upside down and then flip it over so it's right side up (this coats it nicely with oil). Cover tightly with plastic wrap and let it rise in a warm place until doubled, about 2 hours. (This can be in a nice warm spot in your kitchen, or you can turn the oven on for a minute and stick the dough in there).
6. Punch dough down and divide it into four balls, again pulling the top around and down and pinching the bottoms closed. Cover with plastic wrap and let rise in a warm place another hour
7. Preheat your grill to medium-high.
8. Prepare your toppings so they are all ready to go- dice your veggies, make or take the sauce out of the fridge, grate cheese. For tender veggies (or potatoes), cook them before adding them to your pizza. The pizza cooks quickly, so things like onions don't get very soft.
9. Roll out the dough into a 10-12 inch circle-like shape. These things aren't exact
10. Lift the rolled out dough by the edges and drape it directly onto the hottest part of the grill, close the lid, and cook 2-3 minutes. The crust will bubble and grill marks may appear underneath.
11. Use tongs to flip the crust over. Brush it with olive oil (makes it yummier) and add your toppings. Keep quantities light so they cook quickly. Cook for 4-5 minutes- you know your pizza is done when the cheese is melted.


Related Posts Plugin for WordPress, Blogger...